Master the Dip: The Ultimate Guide to Building a Powerful Upper Body
Last updated July 5, 2025 | By: GymS Informer Team

If there’s one exercise that deserves the title “The Squat of the Upper Body,” it’s the dip.
It’s a powerhouse movement that often gets overlooked in favor of the bench press. But let me tell you, if you’re not doing dips, you’re leaving serious strength and muscle gains on the table.
Maybe you’ve seen the dip station sitting in the corner of your gym and wondered, “What’s that for?” or “Are those bad for my shoulders?”
You’ve come to the right place.
This is your ultimate A-to-Z guide. We’ll cover everything from your very first dip to advanced techniques. We will make you a master of this incredible exercise, safely and effectively.
Why Dips Are a Non-Negotiable Exercise
Before we get into the “how,” let’s talk about the “why.” Dips aren’t just another exercise; they’re a fundamental movement.
- Builds Serious Muscle: Dips are a compound exercise, meaning they work multiple muscle groups at once. They are phenomenal for building your chest, triceps, and shoulders.
- Increases Pushing Strength: The strength you build with dips translates directly to other pushing movements, like the bench press, overhead press, and even push-ups.
- Versatility is King: With a small tweak in your form, you can choose to target your chest more or your triceps more. We’ll cover that in detail.
- Bodyweight Mastery: It’s you against gravity. Mastering your own body weight is one of the most functional and rewarding types of strength you can build.
The Big Question: Chest Dips vs. Triceps Dips?
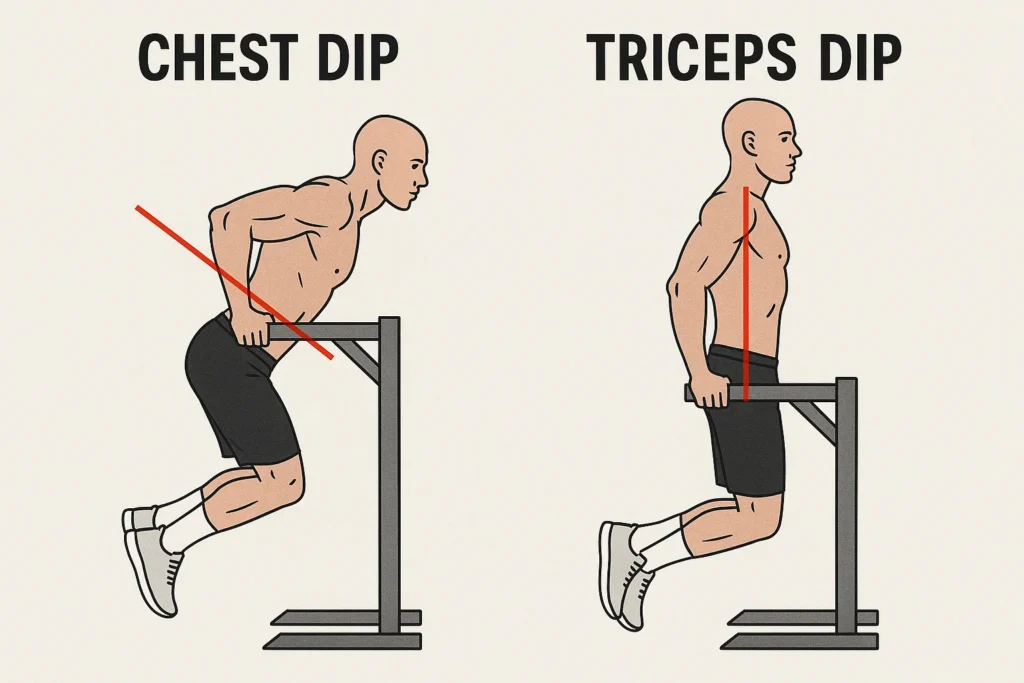
This is the most common point of confusion. The same exercise can be modified to emphasize two different muscle groups. It all comes down to your posture.
For a Chest-Focused Dip: Lean Forward
Think of this as a decline bench press. To make your chest the primary mover, you need to:
- Lean your torso forward at about a 45-degree angle during the movement.
- Let your elbows flare out slightly to the sides (not excessively).
- Use a slightly wider grip on the bars if possible.
For a Triceps-Focused Dip: Stay Upright
To put the focus squarely on the back of your arms, you do the opposite:
- Keep your torso as vertical and upright as possible throughout the movement.
- Keep your elbows tucked in close to your body.
- Use a shoulder-width grip.
Before You Dip: A Quick Readiness Test
Hold on! Dips are amazing, but they require a baseline of strength. Jumping in too early can put your shoulders at risk. Ask yourself:
- Can you comfortably hold your own body weight on the dip bars with your arms locked out for at least 30 seconds?
- Can you perform at least 15-20 clean push-ups?
If you answered “yes” to both, you’re ready to try a bodyweight dip. If not, don’t worry! Jump to the “Your Dip Progression Plan” section below to build the strength you need.
How to Do the Perfect Bodyweight Dip (Step-by-Step)
Let’s break down the perfect rep. We’ll focus on the standard, neutral form first.
Step 1: The Setup
Get on the parallel bars. Grip them firmly with your palms facing each other (a neutral grip). Jump or step up so your arms are fully extended and locked out, supporting your entire body weight. Your shoulders should be down and back, not shrugged up by your ears. Your chest should be up and proud. Cross your legs and pull them back slightly.
Step 2: The Descent (The "Down" Phase)
This is the most important part.
- Initiate the movement by bending your elbows.
- Lower your body slowly and under control. Don’t just drop.
- Keep your shoulders pulled back and down. Do NOT let them roll forward.
- Go down until your shoulders are slightly lower than your elbows, or your upper arms are parallel to the floor. Going too deep is a common cause of shoulder pain.
Step 3: The Ascent (The "Up" Phase)
- From the bottom position, push powerfully through your palms.
- Drive your body back up to the starting position.
- Focus on squeezing your chest and triceps.
- Extend your arms fully at the top, locking out your elbows to complete the rep.
Breathing: Breathe in on the way down (the descent) and breathe out forcefully on the way up (the ascent).
Your Dip Progression Plan: From Zero to Hero
Everyone has to start somewhere. Here is your roadmap to mastering the dip, no matter your current strength level.
Level 1: "I Can't Do a Single Dip Yet"
This is the most critical stage. Build your foundation here.
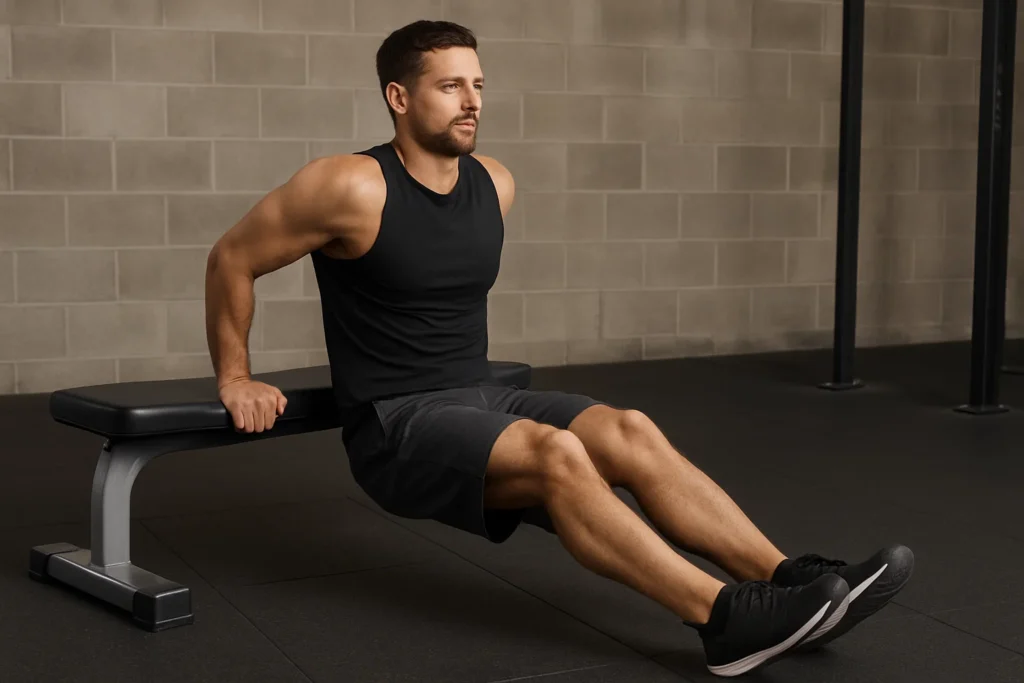
Bench Dips: Sit on the edge of a sturdy bench or chair. Place your hands on the edge, next to your hips. Slide your butt off the bench and support your weight with your arms. Keep your legs straight out in front of you (harder) or bent (easier). Lower your body until your arms are at a 90-degree angle, then push back up.
Negative Dips: This is the secret weapon. Use the main dip station. Get into the top, locked-out position (use a box to step up). Now, as slowly as you possibly can, lower yourself down. Aim for a 5-8 second descent. Once at the bottom, place your feet on the floor or step, get back to the top, and repeat. This builds the exact strength you need.
Assisted Dips: If your gym has an assisted dip/pull-up machine, use it! It uses a counterweight to make you “lighter.” Start with a weight that allows you to do 6-8 good reps and gradually decrease the assistance.
Level 2: "I Can Do a Few Bodyweight Dips"
Congratulations! You’re in the game.
Your goal now is to increase your reps with perfect form. Focus on getting to 3 sets of 10-15 clean reps before you even think about adding weight. Quality over quantity, always.
Level 3: "I'm a Dip Master, What's Next?"
Welcome to the next level. It’s time to add weight.
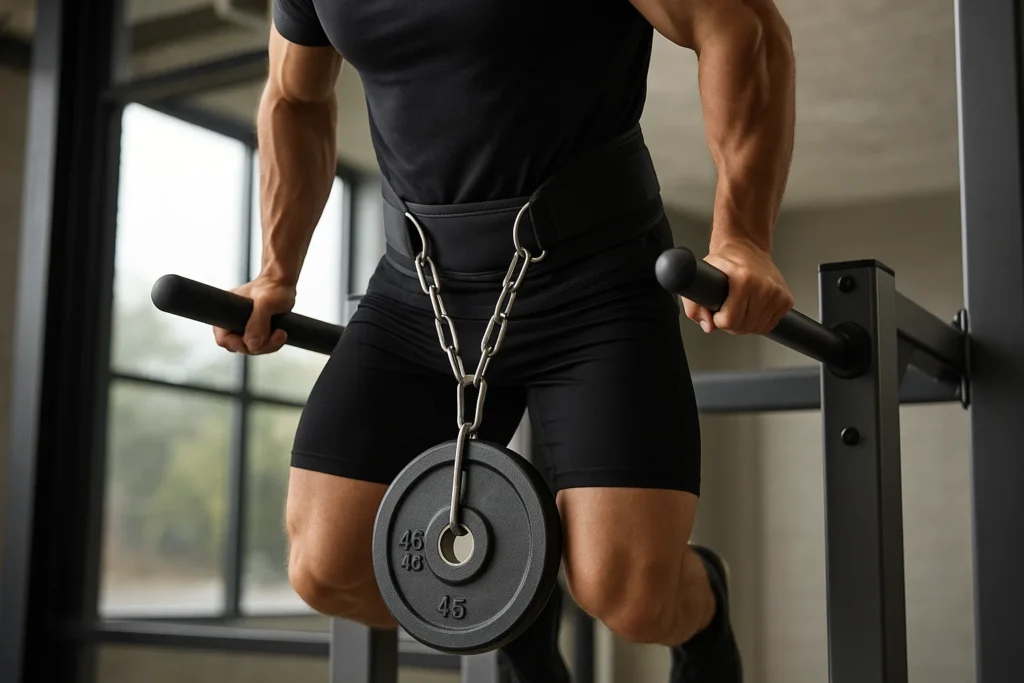
Weighted Dips: The best way is with a dip belt, which allows you to hang weight plates or a kettlebell from your waist. You can also hold a dumbbell securely between your ankles. Start light! Add just 5 lbs (or 2.5 kg) and build up slowly.
Common Dip Mistakes (And How to Fix Them)
- Shoulders Rolling Forward: This is the #1 mistake and the primary cause of shoulder pain.
Fix: Keep your chest up and your shoulder blades pulled back and down throughout the entire movement. Think “proud chest.” - Going Too Deep: Lowering your body until your shoulders are nearly dislocating is a recipe for injury.
Fix: Stop when your upper arms are parallel to the floor, or your shoulders are just slightly below your elbows. You don’t need to go deeper. - Half Reps: Not going low enough and cutting the range of motion.
Fix: Follow the “parallel” rule above. A half rep is a wasted rep. Film yourself if you’re not sure. - Flaring Your Elbows Too Much: While a slight flare is okay for chest dips, excessive flaring can strain your joints.
Fix: Think about keeping your elbows pointing mostly backward, especially for triceps-focused dips.
How to Add Dips to Your Workout Routine
Dips are best performed as a primary or secondary compound exercise.
- On an Upper Body or Push Day: Do them after your main heavy press (like the Bench Press).
- On a Full Body Day: They can be your main vertical pressing movement.
A good starting point for sets and reps:
- For Strength: 3-4 sets of 5-8 reps (add weight if this is too easy).
- For Muscle Growth (Hypertrophy): 3-4 sets of 8-15 reps.
Frequently Asked Questions (FAQs)
1. Are dips really bad for your shoulders?
They are not inherently bad. They are only bad if you have poor form, pre-existing shoulder issues, or do them before you are strong enough. If you keep your shoulders back, don’t go too deep, and progress slowly, they are one of the safest and most effective upper body builders.
2. What if I don’t have a dip station? Can I do them at home?
Yes! You can use two sturdy, identical-height chairs or the corner of a kitchen counter. SAFETY FIRST: Make absolutely sure they will not slip or tip over. This is an at-your-own-risk alternative, and a proper station is always better.
3. Which is better: dips or push-ups?
They are both fantastic S-tier exercises. They complement each other. Push-ups are a horizontal press, while dips are a vertical press. A great program includes both. If you had to choose only one for building mass, dips allow you to add weight more easily, giving them a slight edge for long-term progression.
4. My wrists hurt when I do dips. What can I do?
This is a common issue. Try to keep a “neutral” wrist position, meaning your hand is in a straight line with your forearm. Don’t let your wrist bend back too far. Using push-up bars or parallettes that allow for a perfectly neutral grip can also be a great solution.
5. How often should I do dips?
Because it’s an intense compound exercise, you need to allow for recovery. For most people, performing dips 1-2 times per week is plenty.
The Takeaway
The dip is more than just an exercise, it’s a benchmark of upper-body strength.
By respecting the movement, mastering the form, and progressing intelligently, you can unlock a new level of power and muscle development. Stop walking past that dip station and start owning it.
Start with your readiness test today, find your level in the progression plan, and begin your journey to mastering the king of upper body exercises.