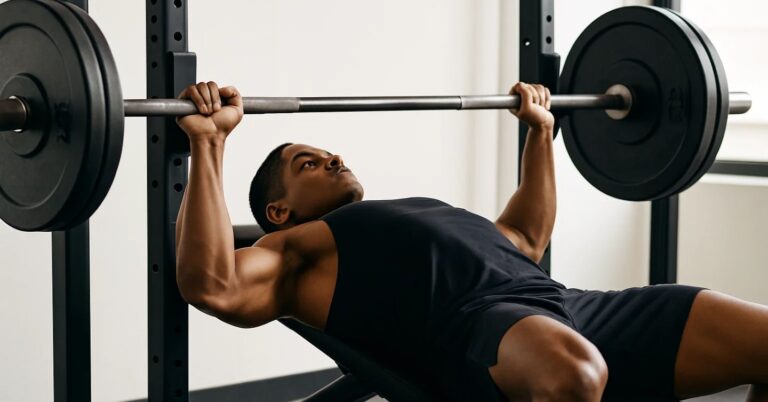
How to Bench Press: A Step-by-Step Guide to Perfect Form
Last updated Jul. 5, 2025 | By: GymS Informer Team

Let’s be honest. The first question anyone asks when you say you lift weights is, “How much ya bench?”
The bench press is more than just a gym exercise; it’s a benchmark of strength, a pillar of workout routines, and the single best way to build a powerful, well-defined chest.
But almost everyone does it wrong.
They flare their elbows, bounce the bar off their chest, and wonder why their shoulders hurt and their chest isn’t growing.
This guide is going to change that. Forget everything you thought you knew. We’re going to break down the bench press from the ground up. Whether you’re a complete beginner who’s never touched a barbell or a seasoned lifter looking to smash through a plateau, this is the only guide you will ever need.
Why the Bench Press is King
Before we get into the how, let’s talk about the why. The bench press isn’t just for ego. It’s an incredible compound exercise, which means it works multiple muscle groups at once.
- Builds Serious Muscle: It’s the #1 exercise for developing your chest (pectoralis major and minor).
- Develops Pushing Power: It directly strengthens your front shoulders (anterior deltoids) and the backs of your arms (triceps).
- Creates Full-Body Stability: A proper bench press engages your back, lats, glutes, and legs to create a stable, powerful base. Yes, you read that right—your legs are crucial!
- Improves Bone Health: Like other weight-bearing exercises, it helps increase bone density.
Anatomy 101: The Muscles Behind the Press
To master the bench press, you need to know what you’re working. Think of your body as a team.
- The Prime Movers (The Stars of the Show):
Pectoralis Major: This is your main chest muscle, responsible for the bulk of the pushing power.
Anterior Deltoids: These are your front shoulder muscles. They help the chest push the bar up.
Triceps Brachii: Located on the back of your arm, your triceps are responsible for extending your elbow and locking out the weight at the top. - The Stabilizers (The Unsung Heroes):
Latissimus Dorsi (“Lats”): Your big back muscles! They create a stable “shelf” for you to press from.
Rotator Cuff: These small shoulder muscles keep your shoulder joint stable and safe.
Glutes & Legs: They provide leg drive and anchor your body to the bench.
Your 5-Step Setup for a Perfect Bench Press
1. Find Your Foundation: The 5 Points of Contact
Your body should be locked into the bench. This creates stability and power. There are five points that must be in contact at all times:
- Your Head is flat on the bench.
- Your Shoulder Blades are pinned back and down on the bench.
- Your Butt is firmly on the bench (it should not lift during the press).
- Your Left Foot is planted on the floor.
- Your Right Foot is planted on the floor.
2. Plant Your Feet
Your feet should be planted firmly on the ground, slightly wider than your shoulders. Pull them back a bit, so they are slightly behind your knees. This allows you to “drive” your feet into the floor during the press, creating full-body tension. Think about trying to push the floor away from you.
3. Create the “Arch” (The Right Way)
This is not an exaggerated, dangerous arch. Squeeze your shoulder blades together as if you’re trying to hold a pencil between them. This will create a slight, natural arch in your upper back and push your chest up. This is the single most important safety and power tip. It protects your shoulder joints and reduces the distance the bar has to travel. Your lower back will have a natural curve, but your butt stays on the bench.
4. Find Your Grip
Lie down on the bench and look straight up at the bar. Your eyes should be directly under it. To find your grip width, start with your hands just slightly wider than your shoulders. The knurling (the rough part of the barbell) has rings to help you be consistent. A good rule of thumb: when the bar is on your chest, your forearms should be vertical (straight up and down).
- Grip it like you mean it: Wrap your thumbs around the bar. A “thumbless” or “suicide” grip is for advanced lifters and can be dangerous. Squeeze the bar as hard as you can. This sends a signal to your nervous system to activate more muscles.
5. The Unrack
Take a deep breath in, brace your core, and push the bar up and forward to clear the J-hooks. Bring it directly over your shoulder joints. DO NOT press up from the racked position; think of it as a small row-and-push forward. Let the weight settle for a second before you begin the descent.
The Main Event: Executing the Perfect Rep
You’re set up and stable. Now for the fun part.
Step 1: The Descent (The “Eccentric”)
- Take a big breath of air into your belly and hold it. This braces your core.
- Begin lowering the bar in a controlled manner. Don’t just let it drop.
- Tuck your elbows. Do not let them flare out to 90 degrees. Your upper arms should form a 45- to 60-degree angle with your torso. Think of your arms moving like arrows (-> ->), not a “T”.
- Aim for the bar to touch your lower chest or sternum.
Step 2: The Pause
- Let the bar make gentle contact with your chest. Do NOT bounce it. A brief, controlled pause at the bottom eliminates momentum and builds real strength.
Step 3: The Ascent (The “Concentric”)
- This is the explosion. Drive your feet hard into the floor (without your butt leaving the bench).
- Push the bar up and slightly back towards your face, so it ends where it started: directly over your shoulder joints. Think of pushing yourself away from the bar, driving your body into the bench.
- Exhale powerfully as you push through the hardest part of the lift.
- Lock out your elbows at the top. That’s one rep.
The Most Common Mistakes (And How to Fix Them Instantly)
I see these every day at the gym. Spot them and fix them.
MISTAKE: Elbows Flared Out Like Wings. This is the #1 cause of shoulder pain.
FIX: Tuck your elbows to a 45-60 degree angle. Think “bend the bar” with your hands—this will naturally engage your lats and tuck your elbows.
MISTAKE: Bouncing the Bar Off Your Chest. This is cheating and dangerous.
FIX: Control the descent. Pause for a split second at the bottom. If the weight is too heavy to do this, lighten the load.
MISTAKE: Butt Lifting Off the Bench. You’re losing power and putting stress on your spine.
FIX: Focus on driving your feet down and forward into the floor, not up. Keep your glutes squeezed and glued to the bench.
MISTAKE: Wrists Bent Backwards. This puts immense pressure on your wrist joints and leaks power.
FIX: Keep your knuckles pointed to the ceiling. The bar should rest on the “meaty” part of your palm, directly over your forearm bones.
Safety First: How to Bench Press Alone
No spotter? No problem. But you MUST be smart.
- Use a Power Rack. Set the safety bars just below the level of your chest when you have a slight arch. If you fail, you can safely lower the bar onto the pins. This is non-negotiable for heavy lifting alone.
- Master the “Roll of Shame.” If you get stuck without safety bars, this will save you. Lower the bar to your chest, then carefully tilt the barbell and roll it down your torso, over your abs, and onto your thighs. Then you can sit up. It’s awkward, but it’s safe. Practice it with a light weight so you know what to do.
- Don’t Use Barbell Collars/Clips. If you’re benching alone without safety bars, don’t use clips. This is a last resort. If you get stuck, you can tilt the bar to one side to let the plates slide off, then do the same on the other side. This is loud and messy, but better than being trapped.
Frequently Asked Questions (FAQ)
1. How much should I be able to bench press?
This is like asking “how long is a piece of string?” It depends on your age, sex, weight, and training experience. The answer is: more than you could yesterday. Focus on perfect form and progressive overload (adding a little weight or a few reps over time), not on what the person next to you is lifting.
2. Is a barbell or dumbbell bench press better?
Neither is “better,” they are just different.
- Barbell: Allows you to lift more weight, which is better for building maximum strength.
- Dumbbell: Requires more stabilization and allows for a greater range of motion, which can be better for pure muscle building (hypertrophy) and fixing muscle imbalances.
A good program includes both.
3. How often should I bench press?
For most people, 1-2 times per week is ideal. Your muscles need time to recover and grow. Overtraining will lead to injury and stalled progress.
4. What about Incline or Decline Bench Press?
These are excellent variations that target different parts of the chest.
- Incline Press: The raised bench angle targets your upper chest (clavicular head) and shoulders more.
- Decline Press: The lowered angle targets your lower chest more.
The Bottom Line
The bench press is a skill. Like any skill, it requires practice, patience, and attention to detail.
Don’t just lift the weight. Feel the movement. Feel your lats engage, your feet drive into the floor, and your chest and triceps fire to move the bar. Start with a weight you can control perfectly—even just the empty barbell—and build from there.
Now you have the blueprint. Go to the gym not just to work out, but to practice. Be intentional with every single rep. Do that, and you won’t just lift more weight—you’ll build a stronger, more resilient, and more powerful body.


